In this article, you will learn how to deal with CA. First, by minimising it in-camera. Then, by correcting it in post-processing with Adobe Lightroom. [ExpertPhotography is supported by readers. Product links on ExpertPhotography are referral links. If you use one of these and buy something, we make a little bit of money. Need more info? See how it all works here.]
What Is Chromatic Aberration?
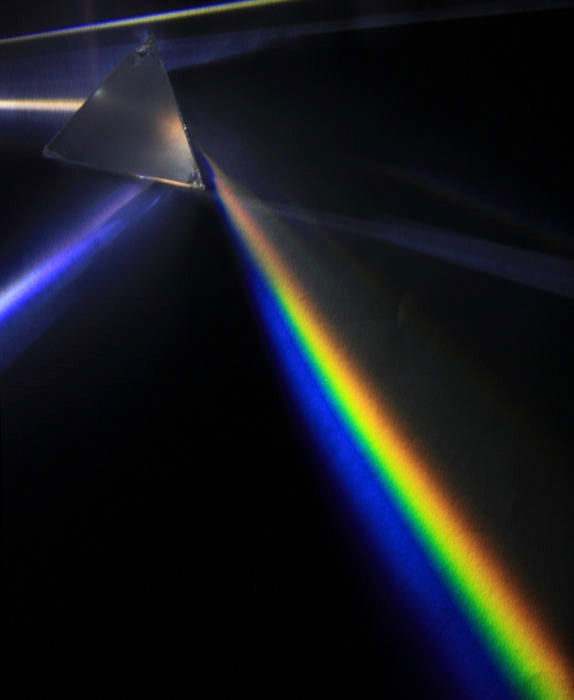
Chromatic Aberration usually appears in the form of purple/red/blue/cyan/green fringes. They can be seen alongside high contrast edges. In laymen terms, CA means finding colors where they shouldn’t be. Every color behaves in its own particular way when passing through a material. A prism “disperses” them, and they form a familiar rainbow. The refractive index causes dispersion. This is the index of the material that light is passing through. Refraction is stronger for light of short wavelengths (blue). It’s less intense for light of long wavelengths (red). Different kinds of glasses cause refraction or dispersion of various intensities. There are two types of Chromatic Aberration: Longitudinal and Lateral Chromatic Aberration.
Longitudinal Chromatic Aberration
What Is Longitudinal Chromatic Aberration?
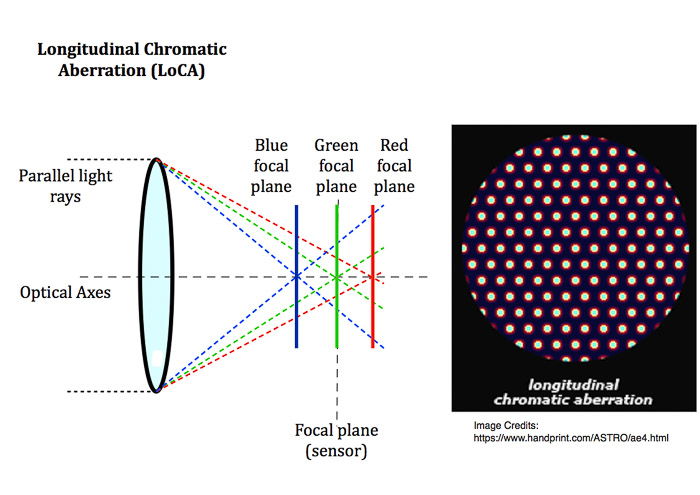
Longitudinal Chromatic Aberration (LoCA) is also known as ‘axial’ aberration. It appears when the lens cannot focus on all the different colors on its focal plane (the sensor). One or more colors are then focused either in front of or behind the focal-plane.
What Does LoCA Look Like?
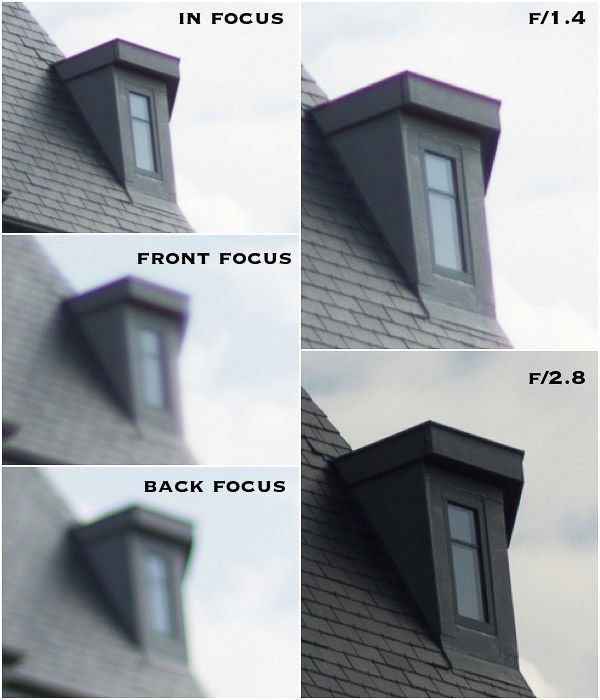
LoCA appears in high contrast areas and is visible either at the edges or in the center of the frame. It presents itself as a blurred purple or green fringe. It’s either in front or behind the object in focus. The image below shows some chromatic aberration. It’s along all the contrasting edges, regardless of their position in the frame. LoCA is easy to identify. It changes colors when you focus in front of or behind the object. And it disappears at a narrow aperture. Take a look at the image below. The blurred purple color in the image taken at f/1.4 is in front of the window edge. It’s not only alongside it. This makes it difficult to correct in post-processing.
Transverse Chromatic Aberration
What Is Transverse Chromatic Aberration?
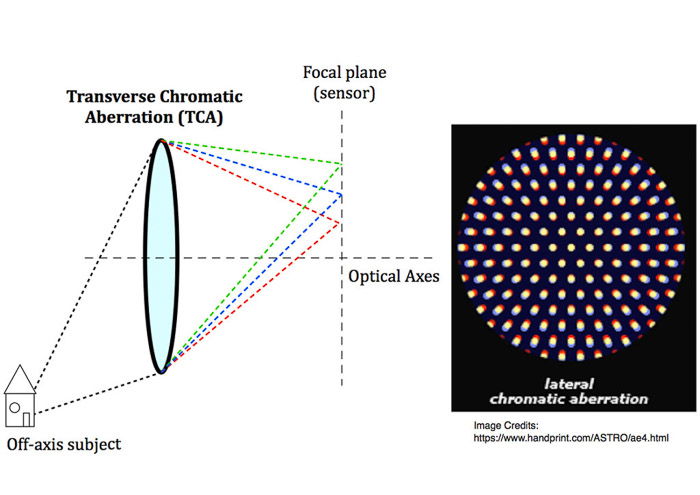
Transverse Chromatic Aberration, TCA, is also known as lateral. It happens when the colors are on the focal plane, but not all in the same point. It is more present toward the edges of the frame and is not shown in the central part of the frame.
What Does Transverse Chromatic Aberration Look Like?
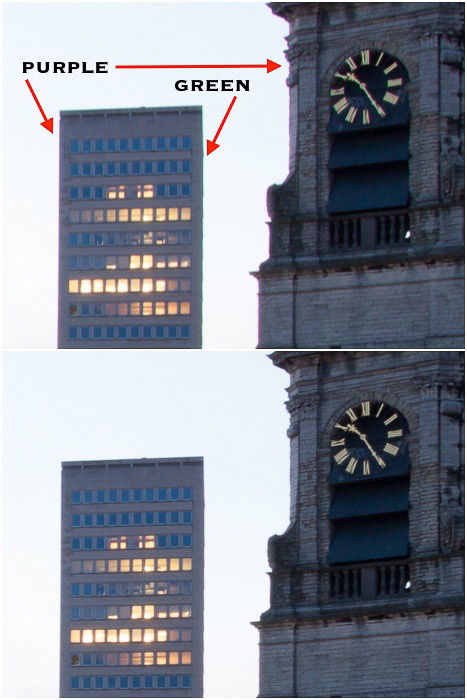
Transverse Chromatic Aberration appears as sharp color fringing. It’s alongside high contrast edges of a dark or bright area. The color fringes are complementary colors along opposite edges. Left side green, right side red, and so on. Stepping down your lens does not correct TCA.
How To Reduce Chromatic Aberration on Your Camera
The lens industry puts great effort into minimising CA in their lenses. They do this with low dispersion optical glass and optical elements. Apochromatic lenses, for example, correct chromatic aberration. But a certain amount of both LoCA and TCA is unavoidable. High-quality lenses exhibit much less CA than:
cheap lenses fast lenses when used wide open old legacy lenses cheap teleconverters and wide angle lens converters
How to avoid CA in-camera:
Avoid high contrast scenes Accurate focus to reduce the LoCA blur, making it look smaller Step down your lens by 1 stop or 2, i.e., by using smaller apertures, to remove LoCA Place your subject in the middle of the frame to make it TCA free and crop later to regain a better composition Expose for the highlights and avoiding blowing them up Avoid using the shortest and longest focal length on zoom lenses Experiment with different distances between you and the subject.
How to Correct Chromatic Aberrations in Adobe Lightroom
TCA is usually easier to correct in post-processing than LoCA. Adobe Lightroom lets you remove (or reduce) both with a few clicks. You can find both an automatic and a manual correction for CA. It’s under the Lens Corrections panel of the Develop Module.
Chromatic Aberration Automatic Correction
Nothing could be easier. Tick the box Remove Chromatic Aberration in the Lens Corrections -> Profile panel. Now let Lightroom do its magic.
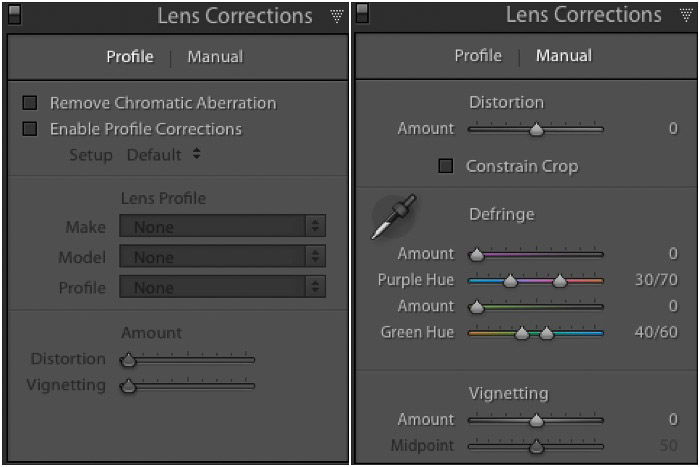
Chromatic Aberration Manual Correction
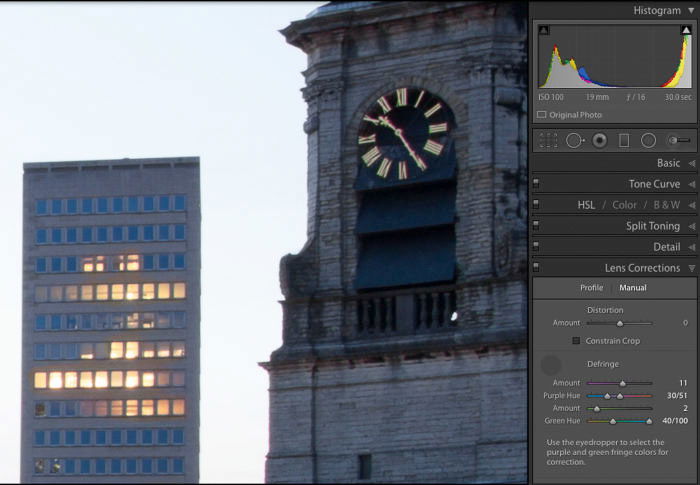
Sometimes, CA automatic correction does not remove all the Chromatic Aberration. In these cases you can go to the Lens Corrections ->Manual panel. Use the eye-drop in the Defringe section to sample the CA along the affected edges. While viewing the image at 100% sample different points along the edges showing CA. Like this, you’ll get the best global result. Repeat the procedure for both the purple/red and blue/green colors. There’s also a manual way to correct CA. This consists of manipulating the amount and color hue sliders. You can find these in the defringe section of the Manual panel. Those sliders control the width, in pixels, of the color fringe and its color hue. They are available for both purple and green color fringing. You can also manipulate the sliders to further reduce, or completely remove, CA. When you use the manual method to correct for the AC, do not focus only on the edges you are sampling. Check the rest of the image as well. Don’t push the correction too far. This could damage affect some other parts of your image.
How to Test Your Lens for CA
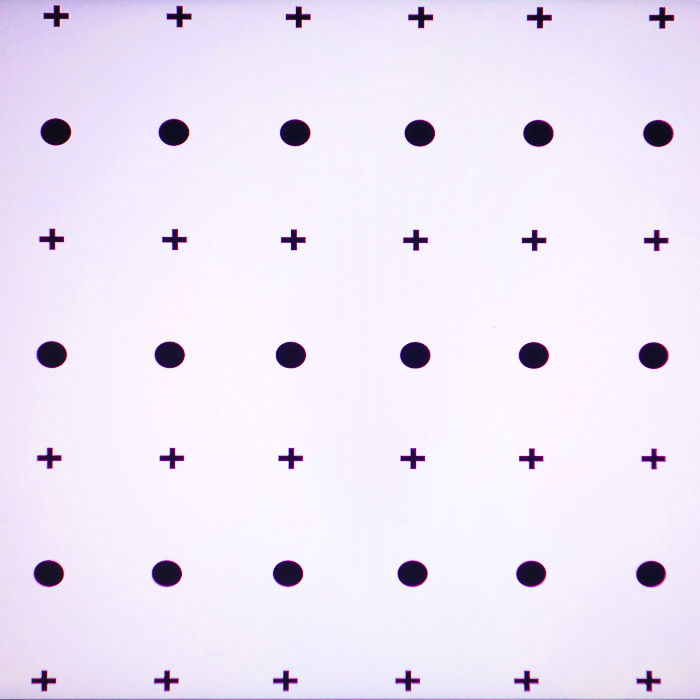
Right-click on the image below to download the chart I use to test my lens against CA. Print it or display it full screen on your monitor set to its max brightness. Now you can start testing your lens against Chromatic Aberration. Take a shot of it and then preview it. Below is the result I obtained with my Sony Rx100 Mk2, and the chart displayed on my computer. The Sony RX100 Mk2 lens has TCA (corrected by the software). And by LoCA (corrected with the eye-drop method). I have worked to maximise the amount of CA in the image. But the complete removal of CA in Lightroom post processing was still two clicks away (see image below).
Conclusion
If Chromatic Aberrations show up in your photos, don’t panic! From reading this article, you now know several tips and tricks to get rid of CA. You can minimise CA on your camera. And you can correct it in post processing. Your photos will turn out the way you want them to. We have a great tutorial on removing Chromatic Aberration in Photoshop. Check it out next. Or read about how to understand shutter speed, focal length, or the f-stop scale next!

![]()


title: “What Is Chromatic Aberration And How To Correct It " ShowToc: true date: “2023-01-14” author: “Joseph Burnett”
In this article, you will learn how to deal with CA. First, by minimising it in-camera. Then, by correcting it in post-processing with Adobe Lightroom. [ExpertPhotography is supported by readers. Product links on ExpertPhotography are referral links. If you use one of these and buy something, we make a little bit of money. Need more info? See how it all works here.]
What Is Chromatic Aberration?
Chromatic Aberration usually appears in the form of purple/red/blue/cyan/green fringes. They can be seen alongside high contrast edges. In laymen terms, CA means finding colors where they shouldn’t be. Every color behaves in its own particular way when passing through a material. A prism “disperses” them, and they form a familiar rainbow. The refractive index causes dispersion. This is the index of the material that light is passing through. Refraction is stronger for light of short wavelengths (blue). It’s less intense for light of long wavelengths (red). Different kinds of glasses cause refraction or dispersion of various intensities. There are two types of Chromatic Aberration: Longitudinal and Lateral Chromatic Aberration.
Longitudinal Chromatic Aberration
What Is Longitudinal Chromatic Aberration?
Longitudinal Chromatic Aberration (LoCA) is also known as ‘axial’ aberration. It appears when the lens cannot focus on all the different colors on its focal plane (the sensor). One or more colors are then focused either in front of or behind the focal-plane.
What Does LoCA Look Like?
LoCA appears in high contrast areas and is visible either at the edges or in the center of the frame. It presents itself as a blurred purple or green fringe. It’s either in front or behind the object in focus. The image below shows some chromatic aberration. It’s along all the contrasting edges, regardless of their position in the frame. LoCA is easy to identify. It changes colors when you focus in front of or behind the object. And it disappears at a narrow aperture. Take a look at the image below. The blurred purple color in the image taken at f/1.4 is in front of the window edge. It’s not only alongside it. This makes it difficult to correct in post-processing.
Transverse Chromatic Aberration
What Is Transverse Chromatic Aberration?
Transverse Chromatic Aberration, TCA, is also known as lateral. It happens when the colors are on the focal plane, but not all in the same point. It is more present toward the edges of the frame and is not shown in the central part of the frame.
What Does Transverse Chromatic Aberration Look Like?
Transverse Chromatic Aberration appears as sharp color fringing. It’s alongside high contrast edges of a dark or bright area. The color fringes are complementary colors along opposite edges. Left side green, right side red, and so on. Stepping down your lens does not correct TCA.
How To Reduce Chromatic Aberration on Your Camera
The lens industry puts great effort into minimising CA in their lenses. They do this with low dispersion optical glass and optical elements. Apochromatic lenses, for example, correct chromatic aberration. But a certain amount of both LoCA and TCA is unavoidable. High-quality lenses exhibit much less CA than:
cheap lenses fast lenses when used wide open old legacy lenses cheap teleconverters and wide angle lens converters
How to avoid CA in-camera:
Avoid high contrast scenes Accurate focus to reduce the LoCA blur, making it look smaller Step down your lens by 1 stop or 2, i.e., by using smaller apertures, to remove LoCA Place your subject in the middle of the frame to make it TCA free and crop later to regain a better composition Expose for the highlights and avoiding blowing them up Avoid using the shortest and longest focal length on zoom lenses Experiment with different distances between you and the subject.
How to Correct Chromatic Aberrations in Adobe Lightroom
TCA is usually easier to correct in post-processing than LoCA. Adobe Lightroom lets you remove (or reduce) both with a few clicks. You can find both an automatic and a manual correction for CA. It’s under the Lens Corrections panel of the Develop Module.
Chromatic Aberration Automatic Correction
Nothing could be easier. Tick the box Remove Chromatic Aberration in the Lens Corrections -> Profile panel. Now let Lightroom do its magic.
Chromatic Aberration Manual Correction
Sometimes, CA automatic correction does not remove all the Chromatic Aberration. In these cases you can go to the Lens Corrections ->Manual panel. Use the eye-drop in the Defringe section to sample the CA along the affected edges. While viewing the image at 100% sample different points along the edges showing CA. Like this, you’ll get the best global result. Repeat the procedure for both the purple/red and blue/green colors. There’s also a manual way to correct CA. This consists of manipulating the amount and color hue sliders. You can find these in the defringe section of the Manual panel. Those sliders control the width, in pixels, of the color fringe and its color hue. They are available for both purple and green color fringing. You can also manipulate the sliders to further reduce, or completely remove, CA. When you use the manual method to correct for the AC, do not focus only on the edges you are sampling. Check the rest of the image as well. Don’t push the correction too far. This could damage affect some other parts of your image.
How to Test Your Lens for CA
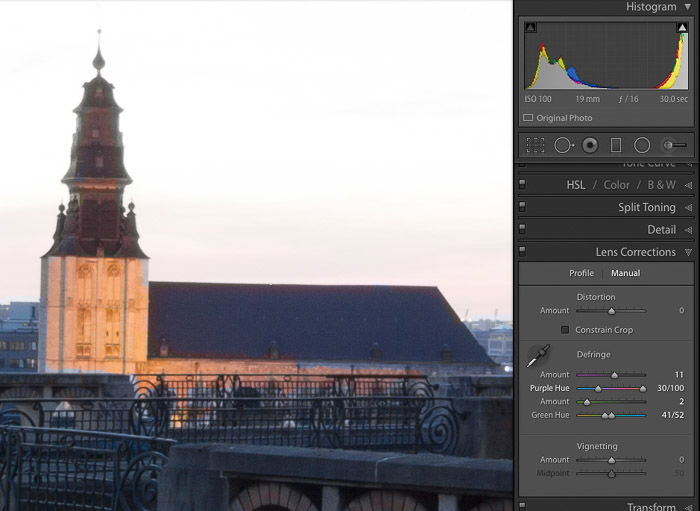
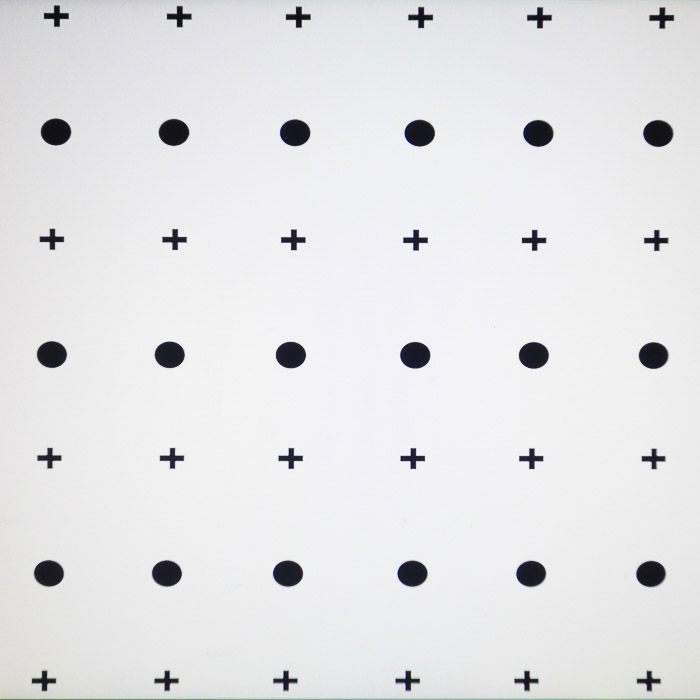
Right-click on the image below to download the chart I use to test my lens against CA. Print it or display it full screen on your monitor set to its max brightness. Now you can start testing your lens against Chromatic Aberration. Take a shot of it and then preview it. Below is the result I obtained with my Sony Rx100 Mk2, and the chart displayed on my computer. The Sony RX100 Mk2 lens has TCA (corrected by the software). And by LoCA (corrected with the eye-drop method). I have worked to maximise the amount of CA in the image. But the complete removal of CA in Lightroom post processing was still two clicks away (see image below).
Conclusion
If Chromatic Aberrations show up in your photos, don’t panic! From reading this article, you now know several tips and tricks to get rid of CA. You can minimise CA on your camera. And you can correct it in post processing. Your photos will turn out the way you want them to. We have a great tutorial on removing Chromatic Aberration in Photoshop. Check it out next. Or read about how to understand shutter speed, focal length, or the f-stop scale next!
![]()
