The Levels tool is one of the most important tools in Photoshop. Here’s how to use it.
How to Use the Photoshop Levels Tool
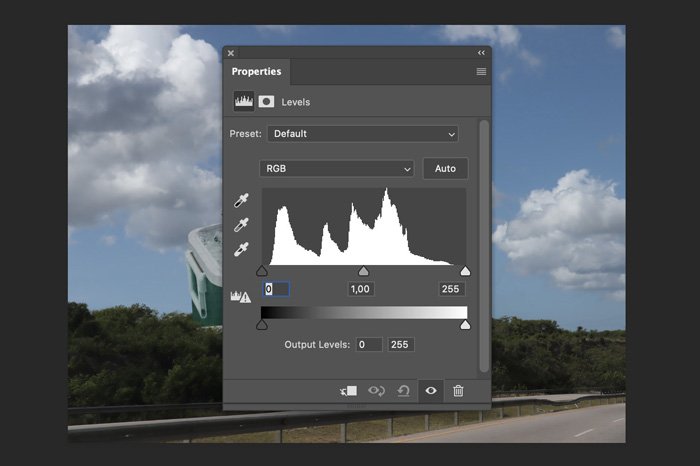
Learning how to use the Levels tool in Photoshop was pretty much one of the first things I learned in photography college. A lot of beginners think you can only adjust the brightness of a photo, but it does so much more. In the Levels panel, the first thing you see is the histogram. The histogram shows you how the photo was exposed. Based on what the histogram tells you, you can adjust the contrast, brightness, and even the tonal range of a picture.
How to Use Photoshop Levels manually
Here’s a quick overview of the sliders and buttons in the Levels panel
Step 1: Black & White Point
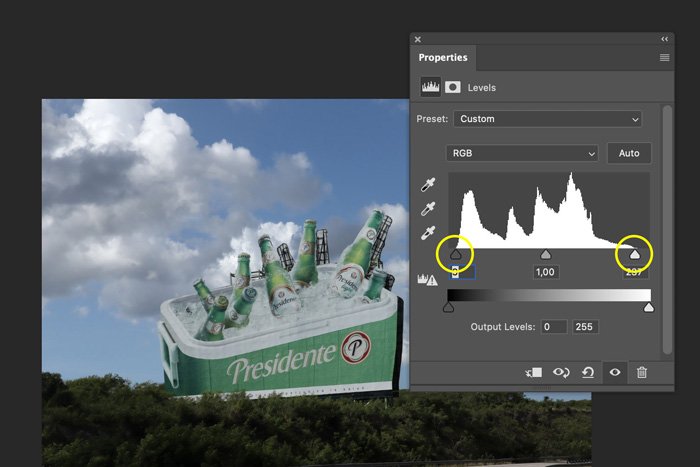
What I like to do first is adjust the Black Point and White Point sliders. The idea is that a photo should have pure black and white in its tonal values. When the histogram doesn’t go all the way to the edges, it means the darkest tonal values are grey, not black and white.
Drag these sliders to the edge of the histogram. This action allows you to set a new Black and White Point. Usually, it also creates a nice contrast. TIP: Hold down the Alt key while doing this to see at what point you lose information in the highlights or shadows.
Step 2: Mid-Tone Slider
Use the mid-tone slider to make the photo brighter or darker.
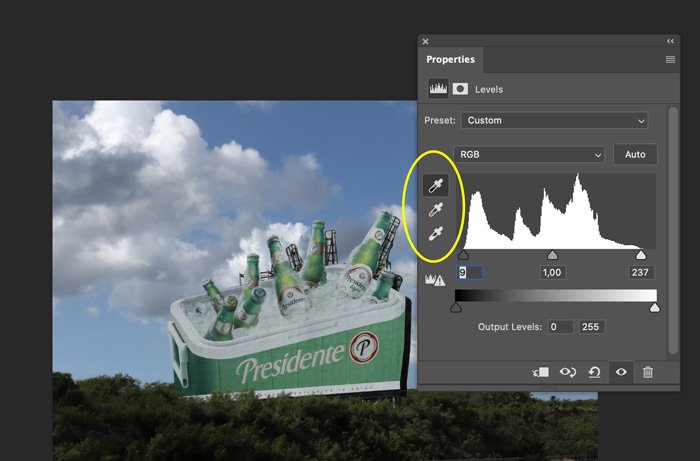
How to Adjust Levels Automatically in Photoshop
There are two ways to set the Levels automatically in Photoshop: Select the white eyedropper to let Photoshop know which area in the photo should be true white. You can do the same with the black. The grey eyedropper allows you to set a grey point. This means you select an area that shouldn’t color, for example, to remove a color cast. Or, even more straightforward, use the Auto button, and Photoshop will set the Levels for you.
Common Photoshop Levels Tool Questions
Where Is the Levels Tool in Photoshop?
There are two ways to adjust the Levels tool in Photoshop. 1. Go to Edit > Adjustments and choose Levels. 2. Add a Levels adjustment layer in the Layers Panel.
How Do I Match a Level in Photoshop?
By matching levels in Photoshop, you adjust the brightness of two photos so that they look the same. You can do this with Levels or Curves.
What Is the Difference Between Levels and Curves in Photoshop?
With Photoshop Curves, you decide what range of tones you change, whereas Levels only allows you to change all tonal values proportionally.
How Do I Change the Tonal Range in Photoshop?
Go to Edit > Adjustments in the top menu and choose Levels. Drag the sliders to change the tonal range of your photo.
Conclusion
A lot of photographers don’t know how to use the Levels tool in Photoshop, and that’s a big mistake. It should be one of the first Photoshop tools you learn how to use. It would be best if you also learned how to read the histogram. It will not only tell you how a photo was exposed but also how to expose your shots better on location. Master the Levels and histogram, and you’ll master the basics of photography.