Hold a Camera and Stand Up: A Guide to Taking Better Photos
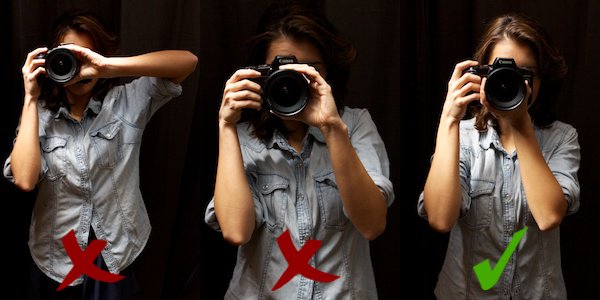
Since holding my camera properly, I’ve been able to reduce the shutter speed. I can hold it still for longer in low light situations. It’s all to do with the grip you use and the point of your center of gravity. This determines camera shake and balance. When you have your arm out (like in the image on the left) you’re barely supporting the camera. And you’re moving your center of gravity away from your body. This may look unusual but it’s something we all do without even realising it. It’s especially common when it comes to taking portrait photos. You want to try to keep your elbows close together. This provides stability and keeps your center of gravity nice and low. The same is true when you’re shooting in portrait. Don’t allow your left arm to separate from your right. You’ll notice that the second photo is still wrong though. The second hand isn’t being used to correctly support the camera. By placing the left hand under the lens, you’re spreading out the task of stabilizing the camera and keeping any stray fingers away from the end of the lens.
Keep your elbows together, against your chest Keep your left hand under the lens, rather than on the side Lean slightly into camera, holding it tight against the forehead Keep your legs open Same for shooting portrait, no excuses.
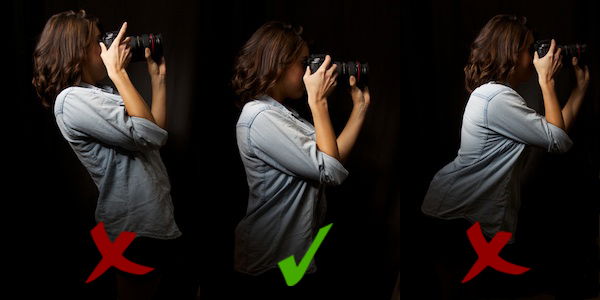
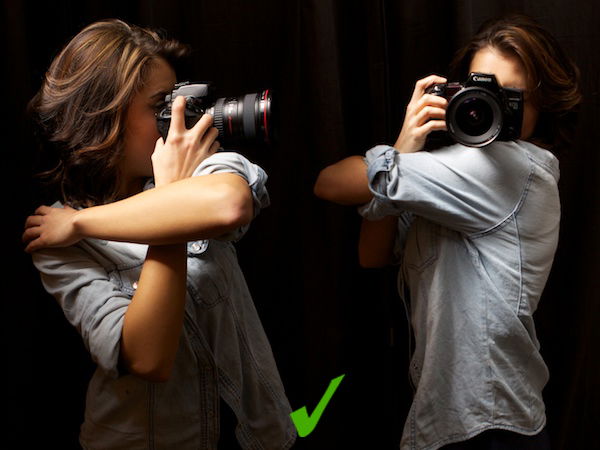
I’ve already spoken about the center of gravity. That’s what it ultimately comes down to. The lower your center of gravity, the less likely you are to move about. The closer the camera is to the core of your body, the easier it will be to hold still. Below is something we’ve all seen time and time again, replicated the world over by tourists and art students. Leaning in and out with your camera might seem like a good idea. In reality, it’s much easier just to take a step back or forth – don’t be lazy! Think of it as a game of Jenga with all the bricks leaning to one side: you’re much more likely to shake and topple over. Keep everything straight and aligned for the best results. If you’re still struggling to keep everything still, here’s an extra technique I’d like to share with you. There are different variations of this technique, usually differing in what to do with the left hand. This is the way that works best for me. Use your left arm as a support by placing your left hand on your right shoulder. Then rest your camera on the top half of the arm. You can then use your camera as normal, just turning to the side of your subject, rather than being straight on. Try it out for yourself and see what works best for you. This isn’t a stance I use all that often because it can be a little awkward and I like to be able to zoom. But I have resorted to it in the past when needs must.
Sitting Down
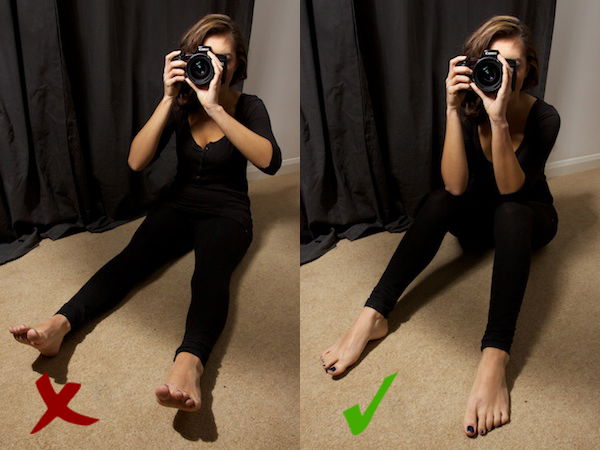
No surprises here – sitting down lowers your center of gravity and increases your balance. There is still a right and wrong way to do it. By stretching your legs out, you’re really only partially supporting your body. And by not leaning in, your balance is going to rock back and forth. Simply lifting up your legs means you have somewhere to put your elbows. And by leaning in, you create a solid core that you can rest your camera on top of. Having your legs open will stop you rocking from side to side. And it will allow you to take sharper photos at slower speeds. And yes, I realise that her left hand is not the right way around – oops! Finally, if you have space to lean on the ground and face forward, this is the best position to be in. Without wanting to repeat myself too much, you can see what you’re supposed to be doing here. The position of your legs no longer matters because all of your weight is pushed onto the front of your body. This makes your arms especially important. In the first photo, the left hand on the outside of the camera pushes the camera down. In the photo on the right, however, it’s supporting the camera from any downward action. And providing a firm platform for it to stand on. Your arms still need to stay close together but not as much as before. They are now acting like legs and need a slightly wider gap to remain supportive. Now you’ve brushed up on how to support the camera, read more here for advice on the technical steps to take perfectly sharp photos!



title: “How To Hold A Camera And Take Sharper Photos” ShowToc: true date: “2023-01-17” author: “Mary Minor”
Hold a Camera and Stand Up: A Guide to Taking Better Photos
Since holding my camera properly, I’ve been able to reduce the shutter speed. I can hold it still for longer in low light situations. It’s all to do with the grip you use and the point of your center of gravity. This determines camera shake and balance. When you have your arm out (like in the image on the left) you’re barely supporting the camera. And you’re moving your center of gravity away from your body. This may look unusual but it’s something we all do without even realising it. It’s especially common when it comes to taking portrait photos. You want to try to keep your elbows close together. This provides stability and keeps your center of gravity nice and low. The same is true when you’re shooting in portrait. Don’t allow your left arm to separate from your right. You’ll notice that the second photo is still wrong though. The second hand isn’t being used to correctly support the camera. By placing the left hand under the lens, you’re spreading out the task of stabilizing the camera and keeping any stray fingers away from the end of the lens.
Keep your elbows together, against your chest Keep your left hand under the lens, rather than on the side Lean slightly into camera, holding it tight against the forehead Keep your legs open Same for shooting portrait, no excuses.
I’ve already spoken about the center of gravity. That’s what it ultimately comes down to. The lower your center of gravity, the less likely you are to move about. The closer the camera is to the core of your body, the easier it will be to hold still. Below is something we’ve all seen time and time again, replicated the world over by tourists and art students. Leaning in and out with your camera might seem like a good idea. In reality, it’s much easier just to take a step back or forth – don’t be lazy! Think of it as a game of Jenga with all the bricks leaning to one side: you’re much more likely to shake and topple over. Keep everything straight and aligned for the best results. If you’re still struggling to keep everything still, here’s an extra technique I’d like to share with you. There are different variations of this technique, usually differing in what to do with the left hand. This is the way that works best for me. Use your left arm as a support by placing your left hand on your right shoulder. Then rest your camera on the top half of the arm. You can then use your camera as normal, just turning to the side of your subject, rather than being straight on. Try it out for yourself and see what works best for you. This isn’t a stance I use all that often because it can be a little awkward and I like to be able to zoom. But I have resorted to it in the past when needs must.
Sitting Down
No surprises here – sitting down lowers your center of gravity and increases your balance. There is still a right and wrong way to do it. By stretching your legs out, you’re really only partially supporting your body. And by not leaning in, your balance is going to rock back and forth. Simply lifting up your legs means you have somewhere to put your elbows. And by leaning in, you create a solid core that you can rest your camera on top of. Having your legs open will stop you rocking from side to side. And it will allow you to take sharper photos at slower speeds. And yes, I realise that her left hand is not the right way around – oops! Finally, if you have space to lean on the ground and face forward, this is the best position to be in. Without wanting to repeat myself too much, you can see what you’re supposed to be doing here. The position of your legs no longer matters because all of your weight is pushed onto the front of your body. This makes your arms especially important. In the first photo, the left hand on the outside of the camera pushes the camera down. In the photo on the right, however, it’s supporting the camera from any downward action. And providing a firm platform for it to stand on. Your arms still need to stay close together but not as much as before. They are now acting like legs and need a slightly wider gap to remain supportive. Now you’ve brushed up on how to support the camera, read more here for advice on the technical steps to take perfectly sharp photos!


