In this article, I will show you how to manage all types of natural light outdoors. Soon enough you won’t be waiting for the golden hour, but venturing out there in the midday sun.
What is the Best Time to Take Pictures Outside?
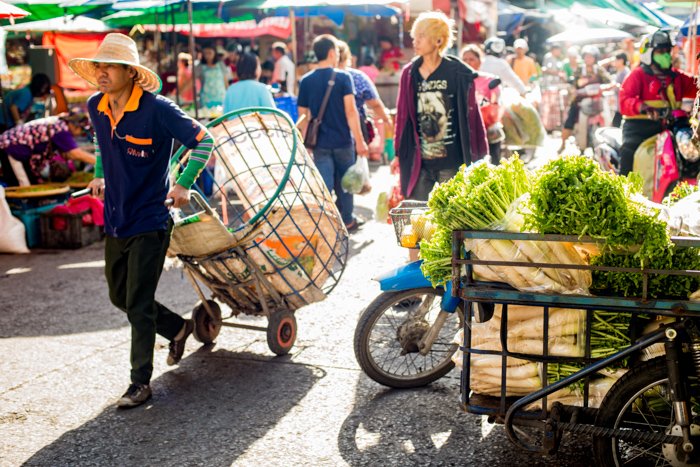
When you have your camera with you and the natural light best fits the mood of the photos you want to take. This is the best time for outdoor photography. Let’s say you want to make edgy portraits with low-key lighting and dark shadows. Then the middle of a sunny day will be better than the golden hour. Capturing a busy scene at a fresh market will be best earlier in the day. With the sun a little higher in the sky than during golden hour, the shadows will be longer and the light brighter. Activity at most fresh markets is at a peak earlier in the day also. Dawn, dusk, and nighttime are also great times for adding a diverse mood to your photographs. I don’t believe there is one best time to take pictures outside. You must choose the time of day and season. And also whether you want full sunshine or diffused light, as you would get on a cloudy day. Let’s break it down and look at how light is different depending on the time of day. The time of year and whether it’s cloudy or sunny also have considerable influence on the mood of a photo. These are the major variables in determining the best time of day to match the intent you have for your photos.
Best Times For Natural Light Outdoor Photography
Dawn and dusk Golden hour Before and after golden hour Middle of the day Night
Dawn and Dusk
This is at either end of the hours of daylight, when the sun is below the horizon. This is twilight time. Twilight occurs when Earth’s upper atmosphere scatters and reflects sunlight. This light illuminates the lower atmosphere. The length of twilight time is dependent on your proximity to the equator. The closer you are to the poles, the longer the twilight time will be. Often twilight is referred to as blue hour by photographers because the light and sky can have a blue tint. Whoever coined this term did not live near the equator. We do not get anywhere close to an hour of twilight in the tropics. Twilight is low and soft. You will need to use a higher ISO than during daylight hours, a slower shutter speed, and/or a wider aperture.
Golden Hour
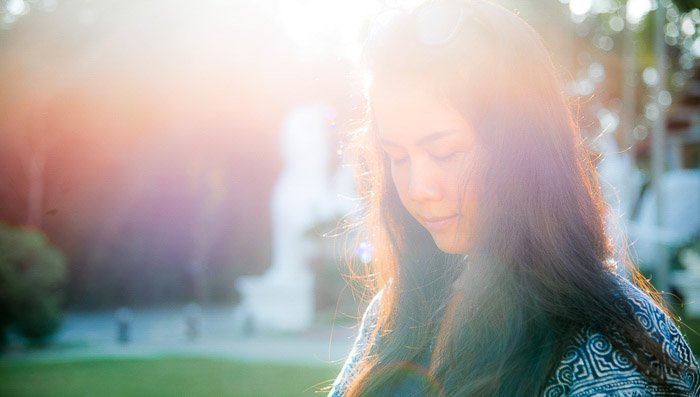
This is the time shortly after sunrise and shortly before sunset. It doesn’t always last for an hour. When the sun is closer to the horizon, its rays travel through more of the earth’s atmosphere. This softens the light and causes it to be a warmer color temperature. Many photographers consider the golden hour to be an optimal time to take photos. The soft, warm light is easier to work with because the contrast is lower. Creating backlit portraits during the golden hour can be easier than at other times of the day. Light will be lower and less harsh than in the middle of the day. You may need a higher ISO, a slower shutter speed, and/or wider aperture than in the middle of the day. Lens flare caused by the sun’s low angle can occur when you are pointing your camera in the direction of the sun. This can either help or hinder you photograph depending on the style of picture you want.
Before and After Golden Hour
This is mid-morning and mid-afternoon. The sun is higher in the sky and still casting long shadows on sunny days. Light is brighter and the color temperature isn’t as warm as during the golden hour. Portraits can be more difficult if your subject is facing the sun. They will tend to squint. But landscapes, seascapes, and cityscapes will have interesting shadows. There will often be less atmospheric haze than earlier in the morning or later in the day. With more light, you can use a lower ISO, a faster shutter speed, and/or narrower aperture.
Middle of the Day
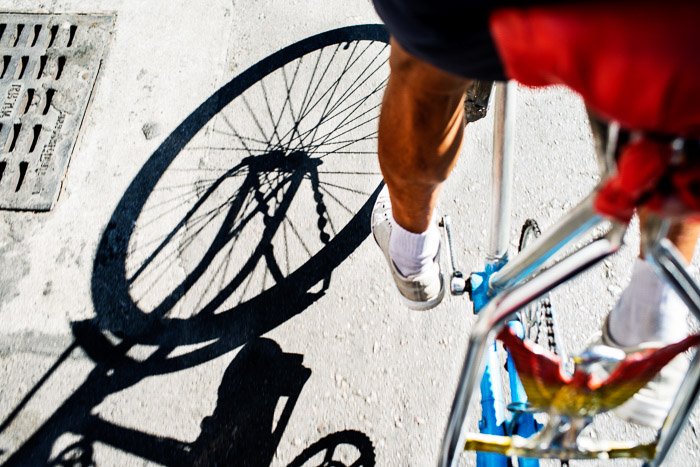
These are the hours before and after midday when the sun is high in the sky. On sunny days, the light will be harsh and the contrast high. Many photographers do not bother to use their cameras at this time. With little atmospheric filtering, the light from the sun is harsh. Shadows will be shorter and very dark on sunny days. You will be able to use a lower ISO setting, a faster shutter speed, and/or narrower aperture. This is due to the strength of the light. In the middle of sunny days, try using a reflector or other fill light for outdoor portraits. Shadows can be problematic if you have no control over your subject or the option to add a fill light.
Night Photography
Photographers can face challenges at night with little or no natural light. This often inspires creativity because of the limitations of our cameras. They’re usually not as capable of recording images in low light as they are when the light is good. You will need to use a tripod and slow shutter. Raising your ISO as high as you can is another option. Using a wider aperture on a prime lens or high quality zoom will assist you in getting better night time photos. Often you will need additional light sources. It’s during the hours of darkness it becomes more possible to create photographs in ways our eyes do not see. By using a slow shutter speed with a moving light source, you can take pictures of light trails. Using a slow shutter speed is perfect for blurred action, a star-streaked sky, and illuminated cityscapes. Surprisingly, one of the best times to take pictures outside is at night. These are examples of photos we never see naturally with our eyes.
The Two Types of Daylight
Sunny Day Photography
The light will be harsher on sunny days. The contrast will be high. This is always the case when you have a small light source. Even though the sun is huge, it produces a hard light because of its distance from earth. You will know hard light by the type of shadow it produces. Shadows will be dark and have a defined, hard edge.
Cloudy Day Photography
When there is cloud obscuring the sun, the light is diffused and softer. The sun becomes a large light source because the clouds are closer to us. They scatter the light rays and make the light softer. You will know soft light because there will be less contrast and shadows will have softer edges. If the sun is highly diffused, there may not be many shadows at all. Season and time of day will have an effect on the amount of diffusion on cloudy days. When the sun is lower in the sky, light has to travel through more of the earth’s atmosphere. Also, oftentimes, through more cloud too. During the middle of the day, the sun’s light has to penetrate less atmosphere and often less cloud. This is why it is less diffused. Some days are cloudier than others. When there is a heavy overcast, skylight can be very low and diffused. The light will be very dull and flat. But this can be great for black and white portraits. On days with a thin cloud cover, there is more contrast and you can add a different mood. There will still be less contrast than in full sunshine, and shadows will be softer.
Working With the Light
The time of day and the cloud cover are the two most influential variables for natural light photography. Seasonal changes have some effect on light, but it seldom has a significant impact. Understanding these variables equip you to make a choice for when to make your photos. It’s important to pick the right time and light conditions to match the intent you have when making a photo. Think about the mood you want to convey and match the time and weather to suit.
Three Examples of Matching the Light to the Mood
Here are three photos taken at different times of the day in various types of light.
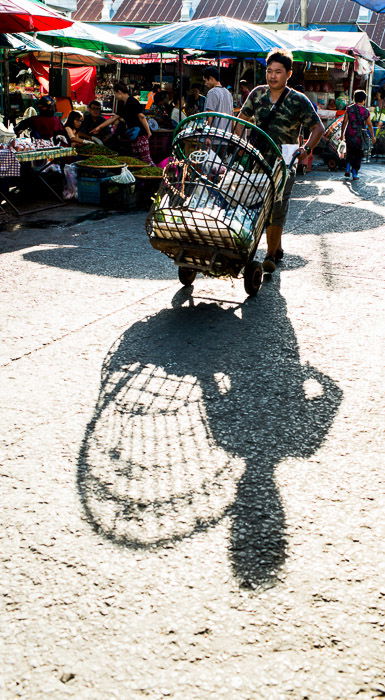
Rice Paddy Kids
This was taken at 4:30 pm at the beginning of October in northern Thailand. Approximately an hour and a half before sunset. The gentle sunlight matches the fun atmosphere. Colors are more vibrant because the light has a warm glow. There were no clouds, but it may have rained earlier. October is the end of the wet season, so there is often more moisture in the air. In the late afternoon and evening, this can add extra warmth and richness to the light.
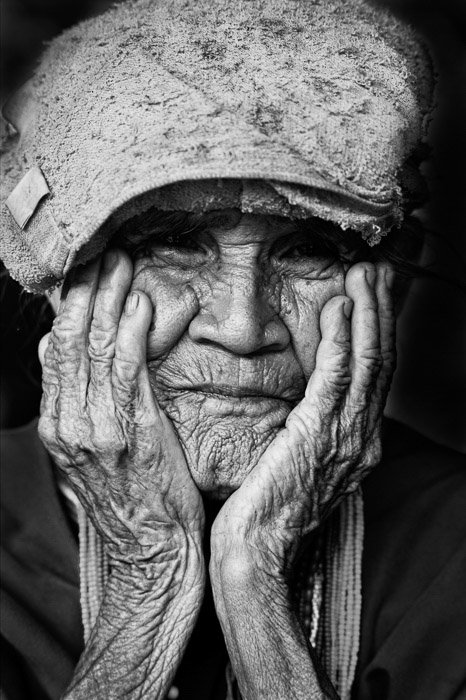
Karen Grandma
Cloudy skies in the middle of the day provide wonderful light for black and white portraits. This Karen grandma was sitting on the front steps of her house one July afternoon at about 1:20 pm. The light is soft, yet still casts some shadow, so the cloud cover was not too dense. Had there been no clouds, I would not have made a portrait of her sitting there. I would have asked her to move under the shade of the veranda or a tree. Harsh sunshine would not have provided the light for the mood I wanted. I love this soft light for black and white portraits. There is still a significant tone range. But important details aren’t lost in the shadows or highlights.
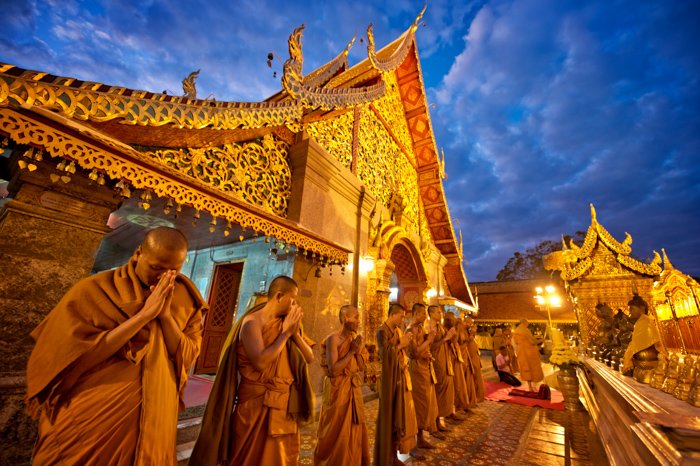
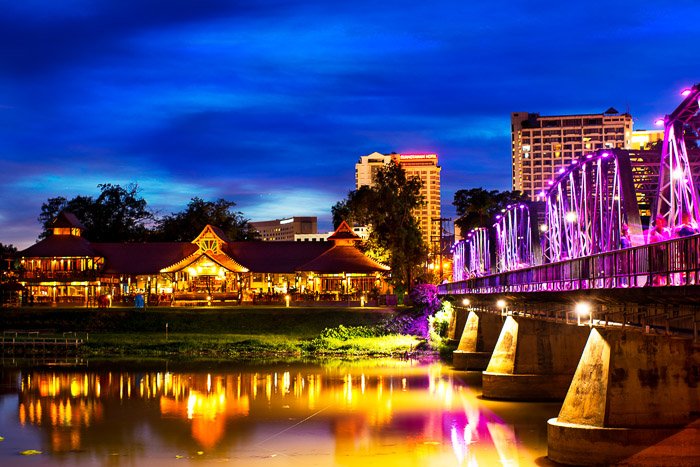
Blue Hour Bridge
During the day this, is simply an interesting old iron bridge. At dusk, the bridge is colorfully illuminated. Careful timing and correct exposure renders the sky a rich blue, even when it’s cloudy. This technique does rely on having additional light. In this case, I used the LEDs lighting the bridge and the lights on the other buildings. Being set up and ready for this photo is essential. The conditions are only optimal for around ten minutes each evening in the north of Thailand.
What To Do When the Light Isn’t “Right”
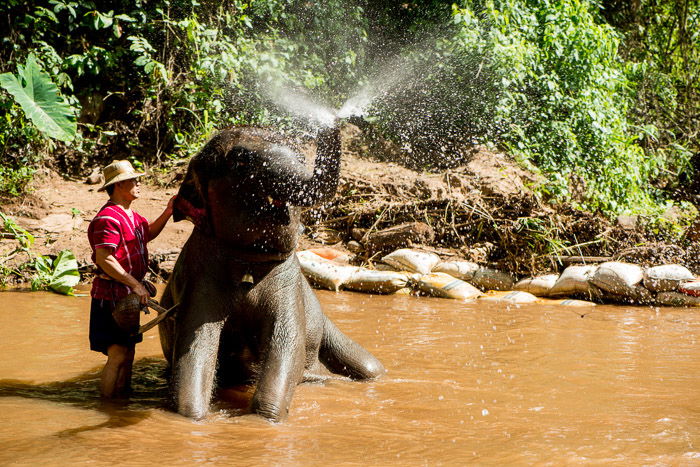
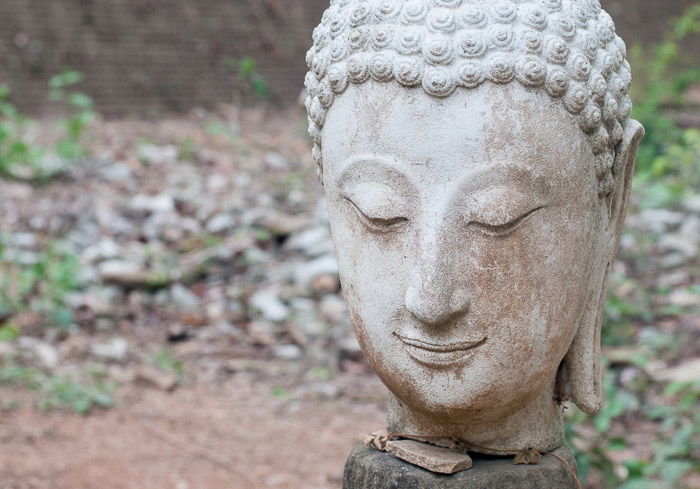
Many photographers do not take photos in the middle of bright sunny days. You can make interesting photographs whenever there is light. Yes, there will be some limitations. But learning to work with the light you have will make you a better photographer. This is when you must get creative. Overcome the mental block that light in the middle of the day is not good for photography. Especially if you are traveling. You may not have another opportunity to photograph in the location at a different time. In the middle of the day, one of my favorite techniques for portraiture is to position my subject just inside a shaded area. I will choose a place where the sunlight is reflecting off the ground or a wall so that it provides a fill light. You must be careful that the surface the light is bouncing off is a neutral tone. Grass will reflect a green tone, which isn’t a good look on a person’s skin. You can use backlighting a subject reflected light in a similar manner. Here my wife is being kissed by an elephant. I took this photo at 2:30 pm on a sunny day. The light on her face is nice and even because the sun is reflecting off the pavement and the bare earth around her. With the right subject, I also make use of the contrast. Remember that your eyes see more detail than your camera in tonal range. Your camera will not record the highlights and the shadow areas well when the sun is bright. Choose to set your exposure for either the highlights or shadows. In my photo of the Buddha statue, I set my exposure for the brightest area. I took a spot meter reading off the forehead, then chose to underexpose it slightly. This gave me a more density in the shadows, which creates a dramatic effect. I could have used average metering and let my camera set the exposure. But the highlights would be overexposed. More detail would have been visible in the shadow areas. But I would have lost the effect of the contrast. I would have had bright patches of sunshine in the background. This would also diminish the effect I wanted to create. I took this photo at 3 pm on a sunny day. I only tweaked the contrast and blacks slightly during post-processing. In comparison, here is the same statue taken at about the same time on a cloudy day. The diffuse light means there is very little contrast. The subject is interesting, but because of the light, it is not such an interesting photograph.
Conclusion
Don’t convince yourself there is only one best time to take pictures outside. Adjust your camera settings to suit the conditions. There is always a photo opportunity. Time of day and lighting conditions very much affect the feel of your photos. But if you have a set time in which to take photos and no control over the light, you must think outside the box. Learn to see the light in new ways and understand the strengths and limitations. At different times of day, you will be able to create pictures with a different atmosphere. Explore all possibilities as you challenge yourself. This will help your photographic style to develop. And your portfolio will become more diverse.