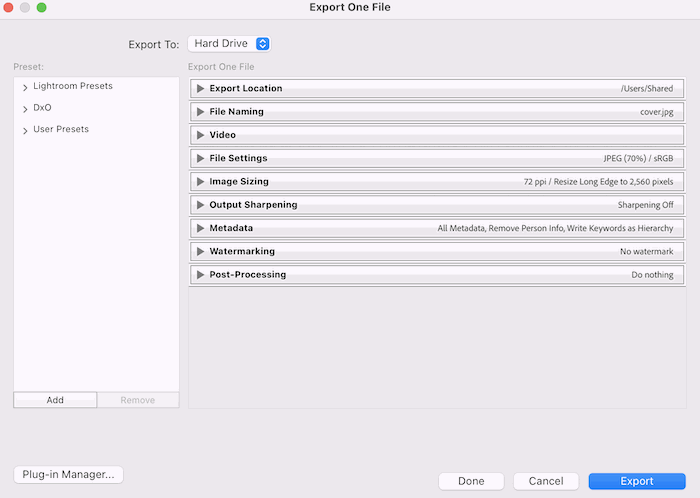
Let’s take a deep dive into the many settings in the Lightroom Classic export dialogue box (File > Export). Many of the options are also in the export panel of Lightroom CC, but not all. To learn how to export photos from Lightroom, see our article ‘How to Save and Export Photos from Lightroom‘. [Note: ExpertPhotography is supported by readers. Product links on ExpertPhotography are referral links. If you use one of these and buy something, we make a little bit of money. Need more info? See how it all works here.]
How to Create the Best Lightroom Export Settings
You love your images and want to share your favourites at the highest quality possible. But this does not always mean exporting the files at 100%. Exporting images from Lightroom is not a one-size-fits-all situation. You share your photos in different ways. The Lightroom export settings depend on where you are sharing the images. But we’ll cover how to best export photos from Lightroom without losing quality.
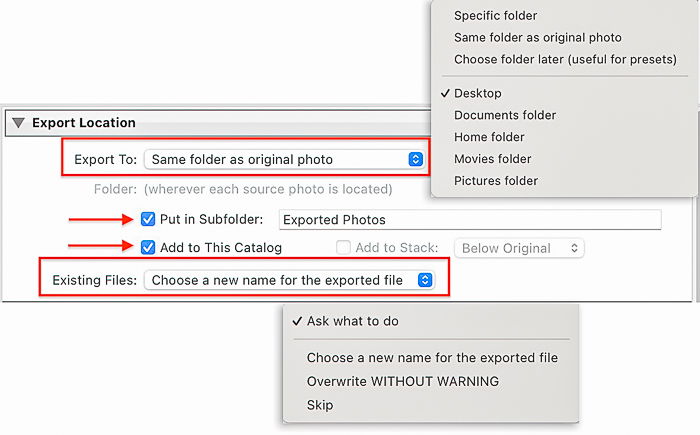
Step 1: Use Export Location
Use the settings under the Export Location tab to help you organize exports. There is no best export location. Choose the location that works for you. Select ‘Same folder as original photo’ to keep your exports with the original photos. But you can also choose to save them to your Desktop in a new folder. Choose where you want to keep your images. You also have the choice to add the created images to a subfolder or your Lightroom catalog. If you want to access the exported file later, you may have to synchronise the folder it’s in (Library > Synchronise Folder).
Step 2: Use File Naming
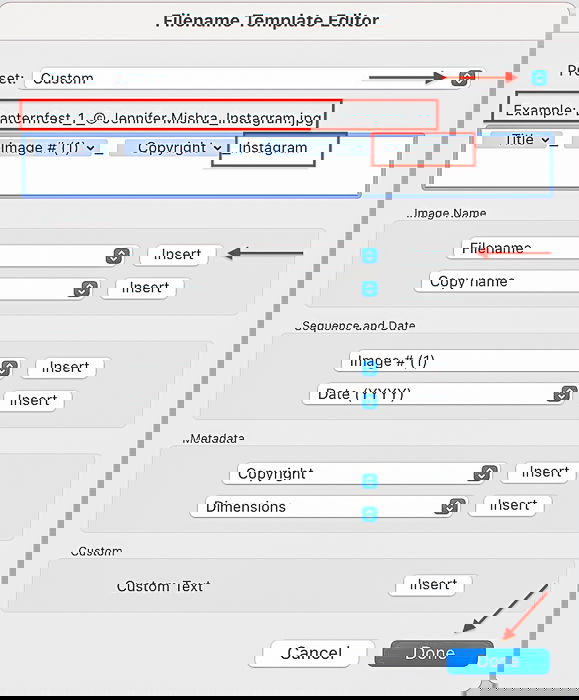
Lightroom Classic exports using the file name encoded by your camera by default. But you can customize the file names in almost infinite ways. Then, you can save your favourite naming combinations to use each time you export. Start by opening the File Naming tab and click the box next to ‘Rename File’. Open the drop-down menu and select Edit. This opens the Filename Template Editor. Lightroom Classic includes default naming choices like ‘Filename’, ‘Sequence #’, ‘Date’, and ‘Title’. Scroll through the drop-down menus to see more choices. Use other options like ‘Image #’ and metadata naming options like ‘Copyright‘. Include as many identifiers as you like. Click the Insert button next to your choices.
Custom Settings and Presets
You can also type directly into the template editor. Add custom text to your image title or punctuation to separate title elements. Lightroom shows you an example of what the title looks like for your selected image. Open the Preset drop-down menu to save your file name as a new template. Select ‘Save Current Settings as New Preset’. Name the preset, and click Create. Finally, click Done. Lightroom CC also lets you custom name your exported files. But the choices are more limited.
Step 3: Adjust File Settings
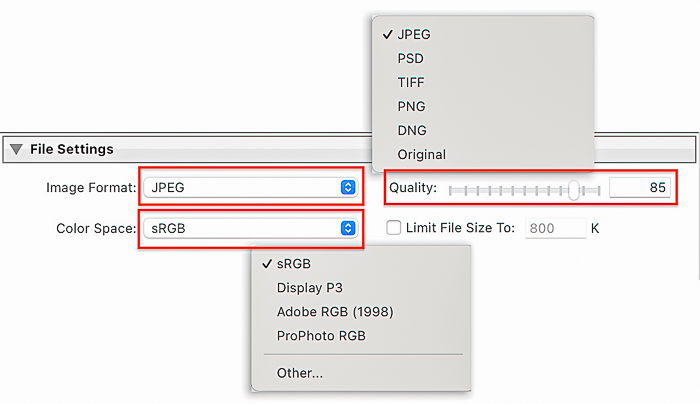
File Settings let you choose the image format, image quality, color space and file size. Lightroom CC has similar settings. But the export panel is organised differently from Lightroom Classic.
Best Formats to Export Photos
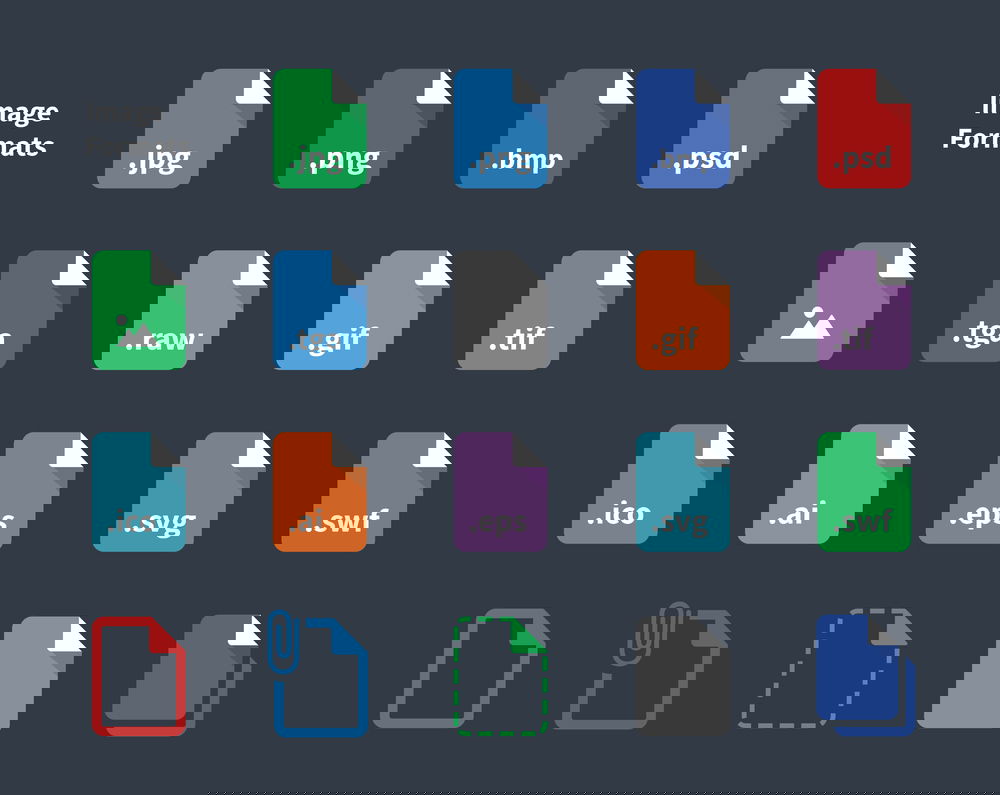
The best image format for online posting is JPEG. It is a universal image file format. But a JPEG is a compressed file. So, you will lose some quality when exporting. This may not be obvious when viewing a photo online. If you want to export a high-resolution image, select TIFF or DNG. For printing, you can choose either a JPEG or a TIFF file. But not all social media platforms accept uncompressed file formats. Some platforms accept RAW files. But this is not common. Switch to GIF if your photo includes animation or PNG if it has a transparent background. Here are the image file formats currently accepted by the most popular social media platforms:
Instagram converts all uploaded photos to JPEG Facebook accepts JPEG, BMP, PNG, GIF, and TIFF Twitter accepts JPEG, GIF, and PNG Flickr accepts JPEG, PNG, and non-animated GIFs. All other formats are converted to JPEG. Pinterest accepts JPEG, PNG, TIFF, BMP, and WEBP Website hosts vary. Wix accepts JPG, PNG, GIF, JPEG, JPE, JFIF, BMP, HEIC, HEIF, TIFF, TIF, WEBP, JPEG 2000, and RAW files.
Best Image Quality and Sizes for Export
Cameras with lots of megapixels create large files. And if you do any editing beforehand in Photoshop, the size of your file can skyrocket past a gigabyte! We want to export photos from Lightroom without losing quality. But exporting full-sized files usually means large file sizes. When exporting for print, export a full-sized file unless the print lab has an image size limitation, but large image files do not work well online. Large image files are slow to load and use a lot of storage space. Also, there is a limit to how much quality can be displayed on most computer screens and mobile devices. Popular platforms compress your images because of the large volume uploaded. If you export images at their recommended size, you should see little difference in image quality.
But if you upload a full-size image and leave the compression up to the platform, you will probably see reduced image quality. High-quality images can become pixelated, and the platform may crop your photo. Plus, reducing the size also protects your full-size image from unofficial downloads. In Lightroom, you can reduce file size in two ways. You can use the slider to reduce JPEG quality by a percentage or set a size limit. Rather than export the files at 100%, select 85%. This will reduce the file size and keep perceived image quality. Some photographers even suggest reducing image quality to 70%. If the social media platform has a file size limitation, check the box next to ‘Limit File Size To’. Then enter a maximum file size. Lightroom creates the best quality file within the size limit. Here are the current image size limitations of popular social media platforms:
Instagram: 30MB Facebook: 8MB Twitter: 5MB on mobile and 15MB on the web Flickr: 200MB Pinterest: 20MB Website hosts: Vary. Wix compresses images over 25MB.
You may also want to reduce file size to make images load faster. But there is disagreement about the optimal image size for online viewing. If the images load slowly, reduce the size to under 1MB (1000KB). If the photos still load slowly, reduce the size to 500KB.
Best Color Space Settings for Export
Most online content is viewed on computer screens or mobile devices where colors are limited. You may prefer to edit in a larger color space like Adobe RGB. But the best color space for posting online is sRGB. This limits the colors to those your viewers can see. It is also the default color space for many cameras. And many platforms compress larger color space to sRGB anyway, sometimes with unpredictable results. The color space can be either sRGB or Adobe RGB if you are printing photos.
Step 4: Adjust Image Size
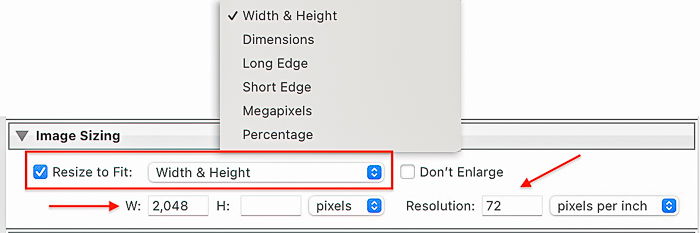
The size of your images will vary with your camera system and how you have cropped it. But most digital cameras create images larger than accepted on social media platforms. The size of the display limits most computers. For instance, my Mac has a display of 2560x1600px and a resolution of 227 pixels per inch (PPI). It does not matter how large the file is. That is the maximum I can see on the screen. Under ‘Image Sizing’, you can export files at defined display sizes and resolutions. You have similar choices in Lightroom CC, but they are more limited.
Best Display Size for Export
If you are printing, export your file with the original display size. Check the box next to ‘Resize to Fit’ if you are posting online. You can choose to enter exact dimensions for both width and height. Or you can choose to enter dimensions for the long or short edge of your image—Lightroom figures out the other dimension based on the current aspect ratio. There is an optimal display size for many social media platforms. The platforms will reduce your image to the maximum size. Some will keep the aspect ratio, but others may crop your photo. There are different recommendations within platforms for cover photos, banners, and ads. But here are the display size recommendations for image posts:
Instagram is 1080px on the bottom edge. Photos in landscape orientation are 1080x608px. Photos in portrait orientation are 1080x1350px (4:5 aspect ratio) Facebook is 1200px on the bottom edge. Pictures in portrait orientation work well as 1200x1500px (4:5 aspect ratio). Twitter images post best at 1200x675px (16:9 panoramas). Flickr Pro images display at 6144px on the long edge. Other accounts display at 2048px. Pinterest images display at 1000px on the short side. Photos in landscape orientation are 1000x1500px. Photos in portrait orientation are 1000x2100px. Website hosts vary. Wix suggests uploading images that are 2560x1440px.
There is debate about the best resolution for posting images to a personal website. It is all about balancing quality and how fast the webpage loads. Most web hosting services let you load whatever file size you want. But the platform may compress or ‘optimise’ your image to increase speed. If you are unsure what display size to use for your website, 2048px is an excellent place to start.
‘Don’t Enlarge’ and Best Export Resolution
If you are working with a small image file, you may be tempted to enlarge the photo on export. Lightroom is not a good tool for enlarging photos. Check the box next to ‘Don’t Enlarge’. If you need to enlarge a photo for printing, use a resize tool. You can find one in Photoshop’s neural filters or use ON1 Photo Raw’s resize plug-in. The best resolution for images viewed online is 72 pixels per inch (PPI). For printing, change the resolution to 300 PPI.
Step 5: Adjust Output Sharpening
Sharpening defines the edges and usually adds a bit of brightness to your image. Most images benefit from a bit of sharpening at export. Depending on your needs, you can choose from a set of output sharpening presets. Both Lightroom Classic and CC include sharpening presets for onscreen and printing on matte and glossy paper. You can choose from three levels of sharpness—’Low’, ‘Standard’, and ‘High’.
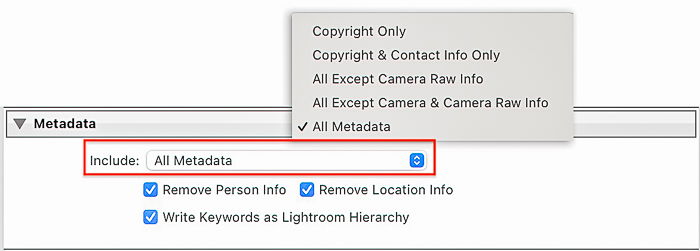
Step 6: Adjust Metadata Settings
Your camera collects a lot of data, including settings and possibly GPS coordinates. Lightroom makes it easy to add more metadata to your images to help you find and sort images. You can add a model’s name and your address. And you may want this personal information attached to the image. But you may not like the world to see it. Because this information lives with an image, it becomes public when you post to many social media platforms. The exception is Instagram, which strips your picture of all metadata. Other platforms may strip some of the metadata. Flickr preserves metadata. Under the Metadata tab, you control which metadata Lightroom Classic embeds when you export images. You can include all metadata, camera settings, or only copyright information. You can also choose to remove information about location and people in your photo.
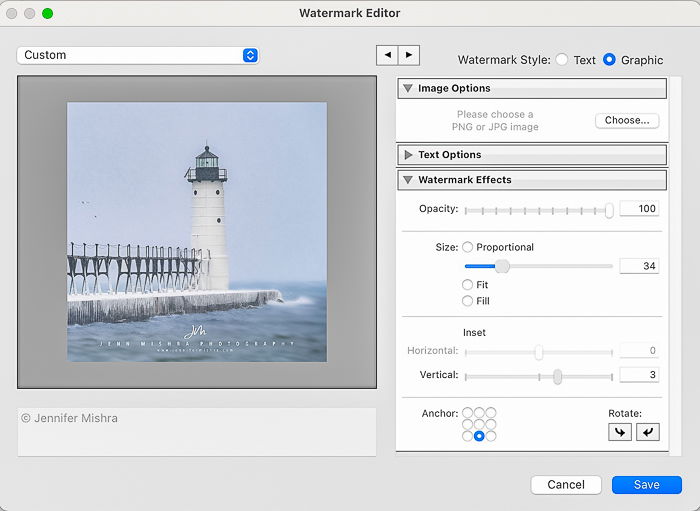
Step 7: Add a Watermark to Images
Adding a watermark is like signing a painting. There is much debate about whether to watermark images or not. One side argues that a watermark detracts from the image. The other side argues that it is like signing a painting and reduces image theft. Adding a watermark at export, rather than onto the image itself, lets you change when and where you add a watermark. Most photographers do not watermark printed images. But you may add it when posting to social media. You can add simple text or a graphic watermark. Click the box next to ‘Watermark’. Open the drop-down menu in Lightroom Classic and select ‘Edit Watermarks’. In Lightroom CC, click the gear icon. This opens the Watermark Editor. From here, you can navigate to a graphic or type a watermark. You can adjust the size, position, and opacity.
Step 8: Setup Export Preset Settings
It is easy to forget which export settings are best for various social media platforms and printing. So, make an export preset of your favourite settings! Click the Add button below the left-hand column in Lightroom’s export dialogue.
Lightroom Export Settings for Instagram
Location: Personal choice File Naming: Filename_Instagram File Settings: JPEG, sRGB, 85% Image Sizing: Width 1080px, resolution 72 PPI Sharpening: Screen, Standard Metadata: Leave the default setting Watermarking: Personal choice
Lightroom Export Settings for Website
Location: Personal choice File Naming: Filename_Website File Settings: JPEG, sRGB, 85% Image Sizing: Width 2048px, resolution 72 PPI Sharpening: Screen, Standard Metadata: Include all metadata, check ‘Remove Person Info’, check ‘Remove Location Info’ Watermarking: Personal choice
Lightroom Export Settings for High-Resolution Print
Location: Personal choice File Naming: Filename_Print File Settings: TIFF, sRGB, 100% Image Sizing: Uncheck resize box, resolution 300 PPI Sharpening: Matte/Glossy, Standard Metadata: Leave the default setting Watermarking: Uncheck the box
Conclusion
The best Lightroom export settings depend on how you want to use the exported file. File and display sizes vary across social media platforms. And what you use for social media posts will not be the same for Lightroom export settings for print. You should determine them on a case-by-case basis! For more tips and tricks, take a look at our complete Lightroom guide! Try out The Preset Collection for shortcuts to perfection! Images in this article were partly provided by DepositPhotos.