In this article, we’re going to talk about practical photography composition tips, which you can use when photographing still life. Let’s get started! [ExpertPhotography is supported by readers. Product links on ExpertPhotography are referral links. If you use one of these and buy something, we make a little bit of money. Need more info? See how it all works here.]
8. Focus Your Still Life Composition Around a Hero Object
First and foremost decide what your hero object is. Most of the time, the feeling that you have complete chaos instead of a harmonious composition comes from not knowing which object is the hero. Instead of focusing on one object, the viewer doesn’t know where to look. This doesn’t mean that your primary object should be in the center of an image. But you should lead the viewer’s eye to it. Place diagonal objects like spoons or straws to ‘point’ at your hero. Make it the most bright-colored and sharp object in the frame. For example, in this image, it’s clear that the apple is the hero. Why? Its bright color immediately catches your attention.
If you’re wondering whether your center of interest is working properly, apply this simple test: Turn away from the scene. Count to ten. And quickly turn around. What object did you see first? Is that your hero? Yes? Good! No? search that thing with something less eye-catching. Don’t remove all the bright details, mind you. Just pay attention to their relative size. Small red berries on a dark background is a beautiful visual accent. But a big red spot of a blurred napkin right behind a pink cake is a distraction.
7. Create Frames to Compose Multiple Subjects
Sometimes there are too many objects to decide which one is the focal point. Say, you have six jewellery items to advertise. In that case, make sure each of them gets an equal amount of attention. One way to do it is to divide them into separate spaces like frames of a shadow box. Make each of them a museum piece worthy of a separate view. Present them as a collection of curiosities. There are many ways to create a suitable division in your still life composition:
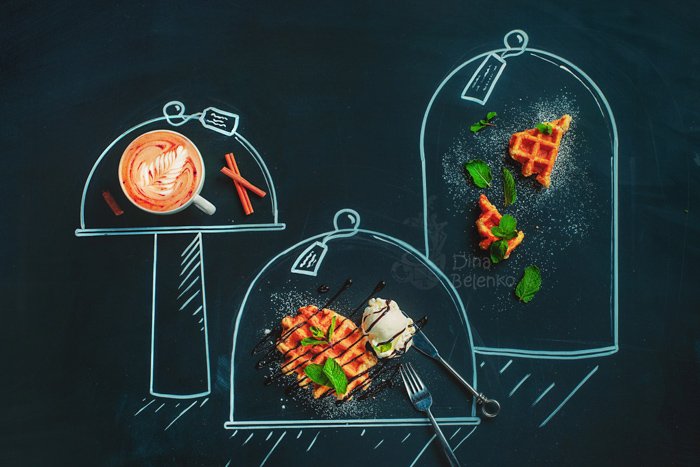
box with separate compartments, chalk drawing, giant puzzle pieces, simplified city maps, paper or chalk representation of a Venn diagram or a pie chart, easels and framed paintings, color blocking, there a spot of each color is assigned to a separate object, collection of suitcases or caskets, Cartesian coordinates, bookshelves, cupcake stands.
The list goes on and on! Pick something that suits your theme and make it the sole ruler of the scene.
6. Break the Monotony to Create Interest
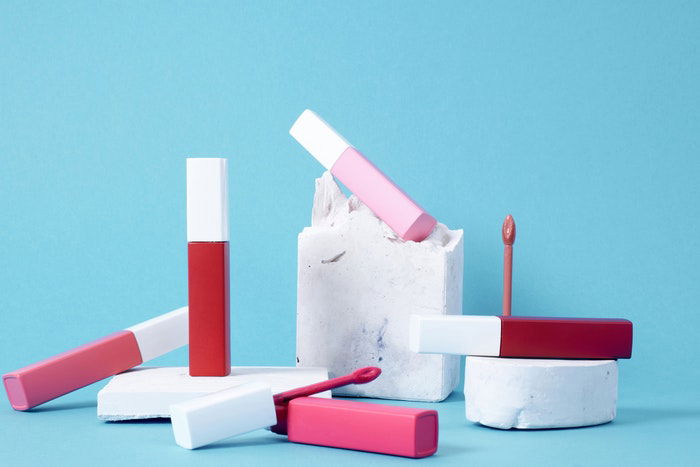
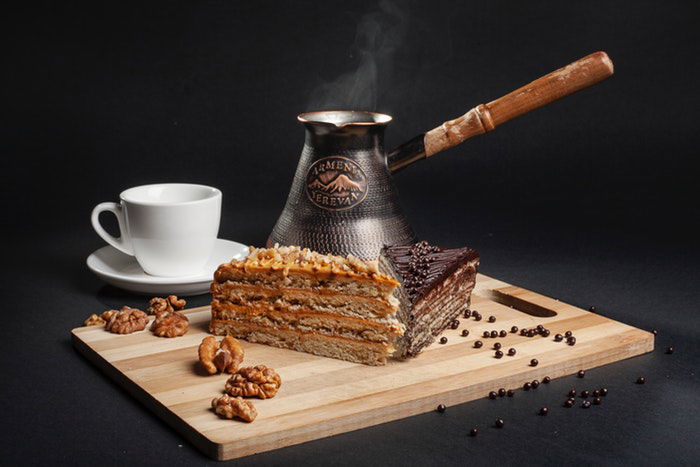
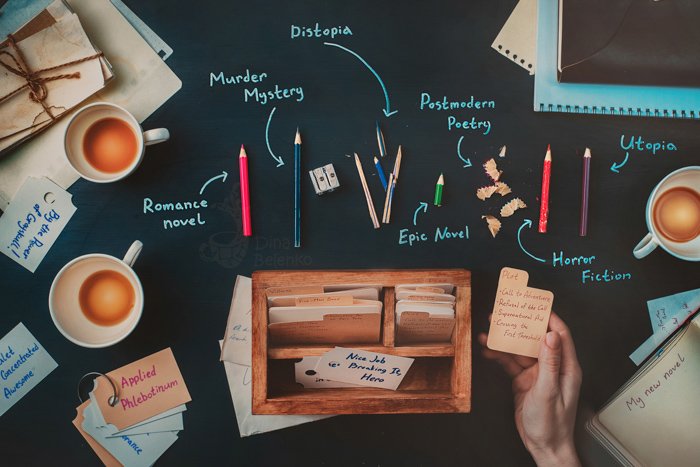
Similar elements carefully placed in strict periodical order may look a bit boring. So, break either their similarity or periodicity. Pick one big plate and two small ones. Cut one apple from there in halves, leave a coffee stain in a place of a coffee cup. Unless your goal is not an obsessively tidy photo (you can take inspiration from a Wes Anderson movie and do exactly that), don’t let your objects look like soldiers at attention. Breaking from monotony will make your still life photos more lively and beautiful. The same goes for any objects forming straight lines. Experiment with different sizes or angles of all the props like cutlery, flower stems, napkin edges, pencils, and even cup handles. Don’t set them parallel to each other. It looks unnatural most of the time. Instead, place them at a slight angle. Make sure they lead the viewer’s eye to your focal point. In the photo below, instead of placing all the lip glosses straight up in a line, they are all placed at different angles, some open, some closed.
When photographing a food-related theme, pointing with forks to your main subject would be excessive and too on the nose. But if an imaginary line created by the fork leads in the general direction of the main object, that would make the viewer’s journey through your photo more comfortable. And they stay a little longer.
5. Use Overlap to Emphasise Volume and Depth
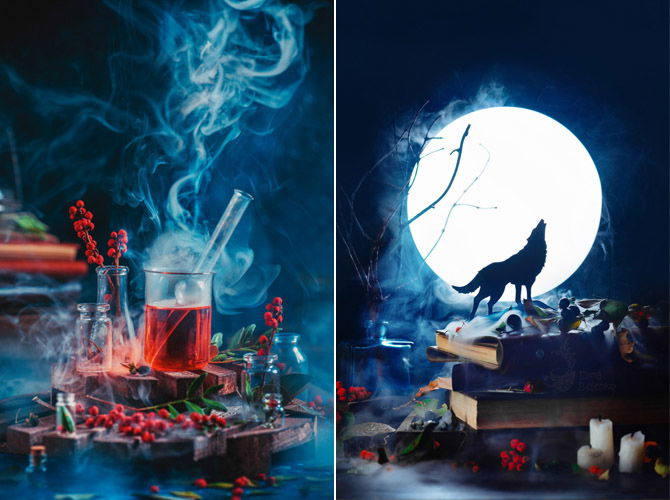
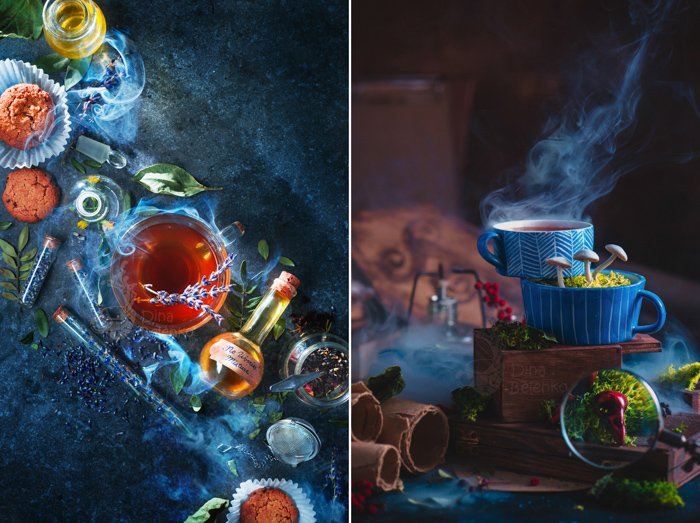
Flatlay got its name because all the items are viewed from above, and none of them block or overlap each other. So the image looks ‘flat’. Don’t get me wrong, it can still be gorgeous, and there are tricks you can use to create volume in a still life flat lay. But overlapping objects are a good way of emphasizing the depth of a scene. It works in still life drawing and in photography too. Take the below alchemical still life, for example. Imagine that I put all the bottles in a straight line on the same distance from my camera. We would have no idea about how deep the scene is. And we would have a bit more trouble recognising the main object. Sure, it would still be a matter of half a second, but it counts. Any viewer notices things like that unconsciously. And it informs their decision whether they like the photo or not. Set some objects and overlap them with other props without completely blocking them. Place some atmospheric details in the foreground and add some to a background. What is the main object in the image below?
You should be able to tell almost immediately that the cakes are the main objects. This is because the slices are overlapping the other props. Make your viewers feel like you’re working in a three-dimensional scene. Let your objects cast shadows and reflexes on each other. Let them interact. That way, you can create depth in your images and give your photo an illusion of that missing third dimension.
Remember that the visual edges of your objects shouldn’t just touch other objects. It should be either a clear overlap or a clear separation. If you have two cups with clear space between them, that’s fine. But if you have two cups and their handles touch slightly, that’s confusing. Move them closer together or pull them further apart.
4. Use Simple Shapes as a Template
Try arranging your composition around a simple shape like a triangle or a circle. This will allow you to balance a bunch of small objects together or come up with a harmonious photo in a lack of time.
Triangles
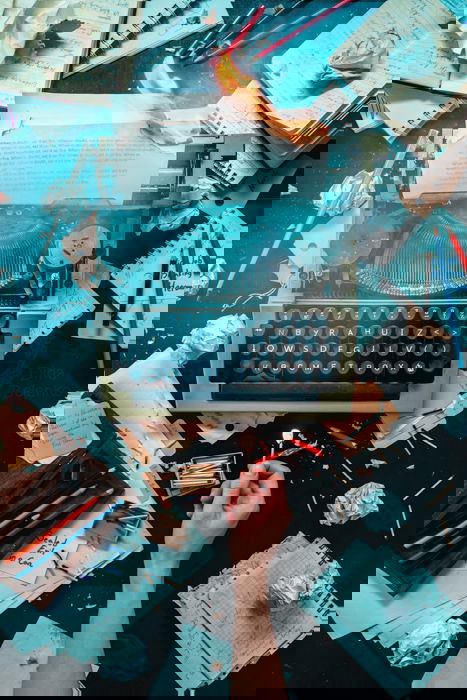
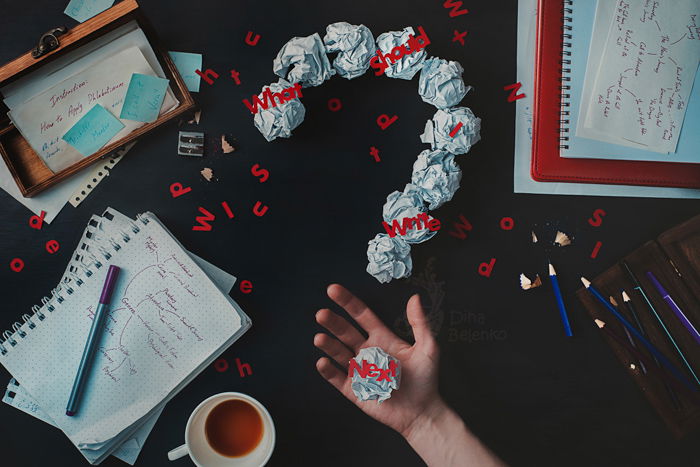
The classic (and my favourite) example is a triangle. First, mentally picture a triangle with a base in the lower part of your frame. And then place your objects inside its boundaries. Most of the time, this structure has a feeling of hidden motion. It’s not as stable as a square but still has a strong foundation. Because of that, a composition based on a triangle looks balanced, but not boring. If you want to create a feeling of something going wrong, of imbalance or confusion, an inverted triangle is your best friend. I use it mostly in my pictures of frustrated writers dealing with creative block, who are ready to burn every single page of unsatisfying work. I put something massive in the top area of my frame (like a typewriter or a curve of a question mark). After that, I add smaller objects right below it, creating the top of an inverted triangle.
Curves
Also, we can count curves as basic shapes in this context. For example, an S-shaped curve can give your composition a sense of smooth motion, simple and elegant. Curves transformed from diagonal lines also work great. Imagine a line going from, say, left bottom corner of your image to a right top one. You can base your composition on this line to make it dynamic, with a strong sense of motion. You can soften that effect by transforming this straight diagonal line into a curve. Imagine that curve and place your objects alongside it, following its motion. There’s no need to be too precise; just follow the general direction. Allow yourself to put extra details clearly outside the curve to make your composition look natural.
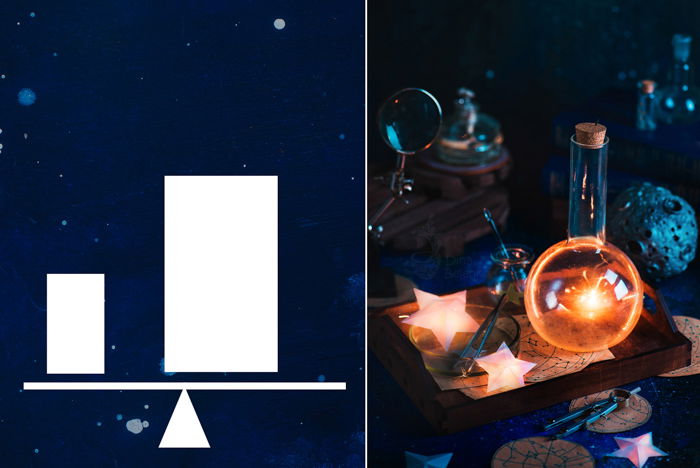
3. Use Balance and Symmetry to Draw the Viewer’s Eye
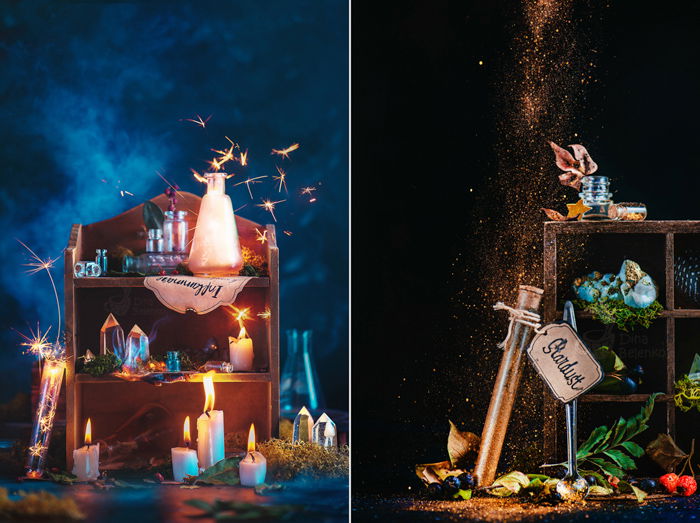
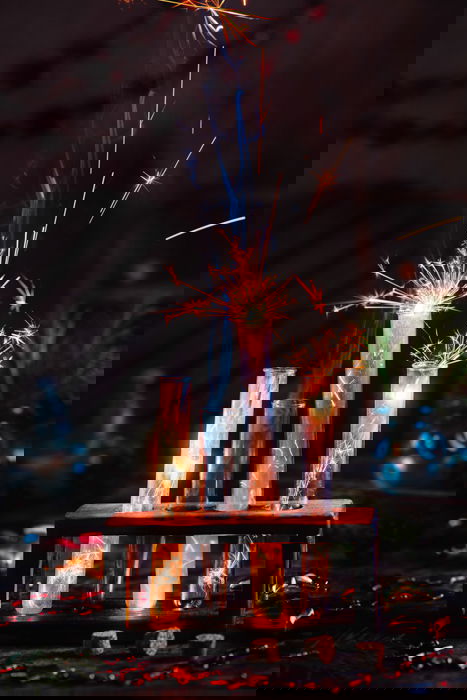
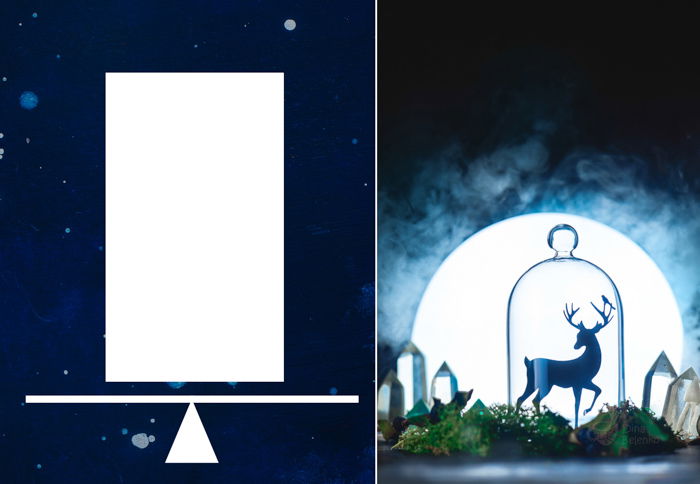
This is my favourite composition exercise! Imagine your photo on a playground seesaw. If the most visually massive object is right in the center, the seesaw is stable. In other words, you have a balanced composition. But this way it can be too symmetrical and a bit boring. Try placing your main object slightly off center. This disturbs the balance, so you need to add something to the other end of a seesaw. Don’t add an object of the same size (it would result in another symmetrical composition). Add a smaller object, but place it further from the center. It will work as a suitable counterweight. For example, in this trapped atar still life, I have a big laboratory bottle with a shining star inside. I placed it slightly off center but added two shining stars on the left side of a frame. As a result, the brightness of those stars helps to create a balanced composition. The seesaw is still.
2. Photograph the Details to Bring Your Composition to Life
Often the problem with composition stems from a lack of believable details. Images may look too clean and too tidy. Details bring life to your photo. Some crumbs from the pie, some scattered sugar or a couple of crumpled paper balls. These details show that someone lives in your image. Now, imagine this tired writer’s table without pencil shavings. Or the below nearly symmetrical hopscotch game without scatted mint leaves. It doesn’t really seem believable, does it? It’s like a house without plants or cosy cushions. You can still live in it, but it could be much more comfortable. But be careful! Don’t overshadow the point of your photo with secondary details.
1. Crop to Make Your Still Life Images More Realistic
As an aspiring photographer, I had one major problem with composition. Indecisive cropping. For some reason, I wanted all my objects inside the frame. Intact. No cuts. If I had a spoon, the whole spoon was in my frame. And I didn’t understand how unnatural it was. And now I see other beginners in still life photography have the same approach. Be bold! Crop tighter! Let your viewer feel that there’s a world outside your frame, that the scene expands sideways and outwardly. Of course, don’t crop key details. On the other hand, do you really need the entirety of this napkin and that coffee cup? Leaving some of the secondary objects outside of the frame makes your scene look natural. As if you had encountered it in real life and just released the shutter. If you have the same fear of cutting something important, try this simple exercise. Make a still life composition your usual way. And after that keep only a half of all objects intact. Keep the key details and let other props be in your photo only partially. Take at least 10 photos with this attitude, and you’ll find that you can do it easily and freely next time. Just this simple improvement will bring life to your shot.
Conclusion
Composition is a lot like learning how to ride a bicycle. For a long time, it’s nothing but failing. And suddenly — voila! You’re doing it instinctually. Try to identify your relative weaknesses and work precisely on their improvement. These tips will lead you in the right direction. Best of luck in your experiments! Try out our Photography Unlocked course to learn how to take great photos with basic gear!